Friday, January 22, 2010

Finally Done Here


It was brought to my attention this morning (thank you Jessica), that awhile back, I said that I wanted to have all my posts on one blog. So, that begins today. No more posting on this blog. But it will stay up and running, if you want to check out any of the past projects.

This means, if you have me bookmarked or are a follower of Creative Chaos, please click on over to Farmgirl Chaos and bookmark and follow that instead.


Thanks. See you over there! :)

Saw Happy!

Knock Off Wood


A couple weeks ago, I came across this awesome blog! If you are like me, you have flipped through a catalog from Pottery Barn (& kids), Land of Nod, Crate and Barrel...you get the idea...and there are many items that you might love to have, but don't want to pay the high price tag. That's where this blog comes in handy. Ana will give you step by step details on how to construct may of the same items, for a fraction of the price.

For me, my first project will hopefully be a bench for my dining table! However, living in an apartment, it makes any type of sawing and construction difficult.

But after reading a few posts from other people, I guess at some hardware stores, they will cut the wood to size for you. So maybe I can do it.

The only thing I need now....a drill! Or one of those little multi-purpose hand tools. Does anyone have any suggestions on what to get?

Thanks to Stephanie for giving me the idea to actually post about my find. I guess I'm not very good at sharing at times. I'll have to work on doing better with that!

Thursday, January 21, 2010

Calendar Cover Up

While iced in yesterday, I finally decided on an idea to help cover this thing up.
Isn't it just lovely? It is in the hallway that leads to the bathroom and bedroom. In the past, I had a big calendar there that I would write on. However, there were numerous mornings where it was very inconvenient to move it when I would have to flip the breaker due to the great wiring job in my apartment.

This year, I decided to go a little smaller. Something that would be easy to move, but still look stylish. And this is what I ended up with.
Much better, don't you think? Here's a closer view of it.

The calendar was a gift from Rachael and Crystal who put this together for Gift-A-Palooza {Day 18} at JessicaSprague.com. I did alter the calendar to fit my needs....I didn't add any pictures. I do have 1 niece and 3 nephews, but how do you pick who you will put on for that month? In addition, I was also able to make the calendar part a little bigger, but still fit the space I was working with.

I then took a piece of thin cardboard I found somewhere, and covered it with scrapbook paper. I took some scallop scissors to the bottom of the product, but think I will do the other sides as well.

I don't remember where I got the clips that are holding the calendar up. I believe it is either a Stampin' Up set or something I got off Scrapbook Steals awhile back. These clips are great! They hold all 12 pages just fine. And it will be nice when I switch to the next month. I can easily remove the past month to show the current month. And if I feel like keeping the past month in the pile, I will just move it too the back of the stack.

There is a magnet holding the calendar to the door of the fuse box. It is blue, with a bunch of writing on it. So I changed that as well. Just traced the shape on to some textured white cardstock and cut it out. I added some brown with white polka dots ribbon to it, topped off with the year.

As you might have noticed, there really is no room to write anything on this calendar. I am okay with that. I carry around 2 calendars with me daily, so I don't really need to have another calendar with all my activities. I think 2 is more than enough. When I did have the bigger hall calendar, I was always trying to keep it up to date, and it just didn't work.

The finished product isn't exactly what I was wanting. I messed up and punched holes in the calendar as well as the cardboard piece. But I made do for now. I have already printed off some new calendars, and will be getting them up soon.

Simple and easy, but it sure looks much better than what was there!

Be sure to check out JessicaSprague.com for some great projects and ideas.

Friday, January 8, 2010

And Another Swap!


Well, here's another fun one to sign up for with Irish Rose Creations! Sign up by January 22nd for another chance to receive a 'sweet' swap from me. :)

(Click on the button above.)

Valentine's Day Swap

Photobucket


Who would like to join me and sign up for this swap? Head on over to Audrey's Country Crafts and sign up before January 17! Maybe you will get a 'sweet' item from me!

(Just click on the picture above.)

Thursday, January 7, 2010

Ribbon & Bead Necklace

While on one of my numerous kid wrangling adventures, I fell in love with one little girl's necklace. Picture this....black shiny beads and ribbon. Love it! Funny thing was, it was her play necklace. For dress up. Lucky her!

What do I do? I decid that I need to make myself one. I went to Hobby Lobby and picked up my supplies. They were either half price or I used a 40% off coupon. I don't remember which was which. But here are the supplies to start.

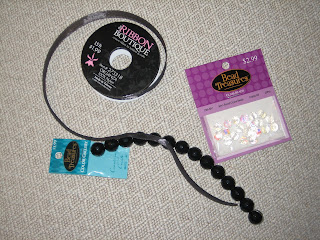
With the model necklace, the ribbon was strung through the beads. But because these beads were smaller, the ribbon would not fit through. So I decided to use thread and 'sew' a necklace. After having to remake the necklace due to the little thread breaking while watching other kiddos, I would strongly encourage you to get some nylon thread. It's in the jewelry making aisle as well. It is much thick and should hold up much more nicely.

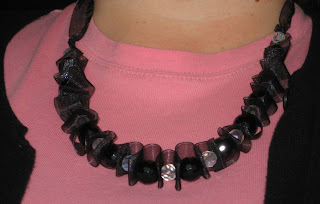
Here's my finished product. I tied the ribbon in the back in to a bow that can be adjusted to be longer or shorter. Hey, it makes it easier to accessorize with different outfits!

For Christmas, I made Gina a necklace very similar to this. Her beads are different, but I think I liked hers more.

I hope to make myself a brown one like this as well, once I can find some beads I like.

There are many different variations that could be done to this necklace. So have fun with different beads and types of ribbon. I used sheer ribbon, so the beads would stand out more. But it would be fun to do a solid colored ribbon with many colorful beads.

Happy crafting!

Tuesday, December 8, 2009

Finally....Giveaway Winner

Well, I gave up on the camera, and just went with random.org. Sorry it took so long.

And here's the winner.......2. Christy! Let me know what you'd like Christy, and I will get it to you soon.

However, because it is snowing right now, I've decided I will give everyone 1 coaster of their choice. So let me know what you want! For those of you that live in the area, hopefully I can give the coaster to you at church or in passing sometime. For the rest of you, please send me your mailing address. I will try to contact you all as well by email.

Remember to let me know what you would like stamped on the coaster, if you want it in black or brown, and what color of tile you'd like.

If you are getting snowed in as well, I hope you have a fantastic day Wednesday. I don't know yet if I will be working or not. If not....I will definitely be working in the craft room.

Happy crafting!